

Blackadders WIP Warlord Titan
- Thread starter The_Blackadder
- Start date
-
The masquerade of murder returns! A new game of Vampires Amongst Us has begun. Unmask the killers, trust no one, and try to survive the night. Find out more and sign up now!
You are using an out of date browser. It may not display this or other websites correctly.
You should upgrade or use an alternative browser.
You should upgrade or use an alternative browser.


Glad I continue to inspire awe. Its what keeps me going on the seemingly interminable project..................
Temporarily indisposed for the past week or so but managed to pull an all-nighter yesterday and brought this baby into a new level of detail. I had some trouble reconciling the trim strips on the edge of the seam between the upper and lower panels of the carapace but the solution appears satisfactory at least in the images.
Its strange that what is see with the naked (Ha, he said naked.) eye is different than what is displayed in a camera image. I have a tendency to elongate images top to bottom when viewing a picture and when I see them in an photograph the perspective/proportion changes. I don't have that problem with TV images and broadcasts on plasma screens bother me greatly when presented in the wrong aspect ratio. Go figure!
Anywho here is the latest run of images complete with inroads into the shoulder carapace magazines starting to be encased. I figure since the Warlord employs both energy and projectile weapons that the area directly above the arms (sic) is devoted to storing the projectile rounds. No point in displaying that as yet but it does logically indicate future reworking.
http://i.imgur.com/chteh.jpg

http://i.imgur.com/9Yhtb.jpg
http://i.imgur.com/UxRAa.jpg
http://i.imgur.com/o9kIR.jpg
Purists may note that I changed a lot in the detail of the rear projection to suit my aesthetic sensibilities but since these vehicles are subjective to the FW, 'many worlds/many interpretations' I feel that Lucius Warlord Titans in a class have variations in that class depending on the 'Forge World' planet of origin. Plus I'm not going to buy a bunch of bitz just to copy the DS original.
Temporarily indisposed for the past week or so but managed to pull an all-nighter yesterday and brought this baby into a new level of detail. I had some trouble reconciling the trim strips on the edge of the seam between the upper and lower panels of the carapace but the solution appears satisfactory at least in the images.
Its strange that what is see with the naked (Ha, he said naked.) eye is different than what is displayed in a camera image. I have a tendency to elongate images top to bottom when viewing a picture and when I see them in an photograph the perspective/proportion changes. I don't have that problem with TV images and broadcasts on plasma screens bother me greatly when presented in the wrong aspect ratio. Go figure!
Anywho here is the latest run of images complete with inroads into the shoulder carapace magazines starting to be encased. I figure since the Warlord employs both energy and projectile weapons that the area directly above the arms (sic) is devoted to storing the projectile rounds. No point in displaying that as yet but it does logically indicate future reworking.
http://i.imgur.com/chteh.jpg
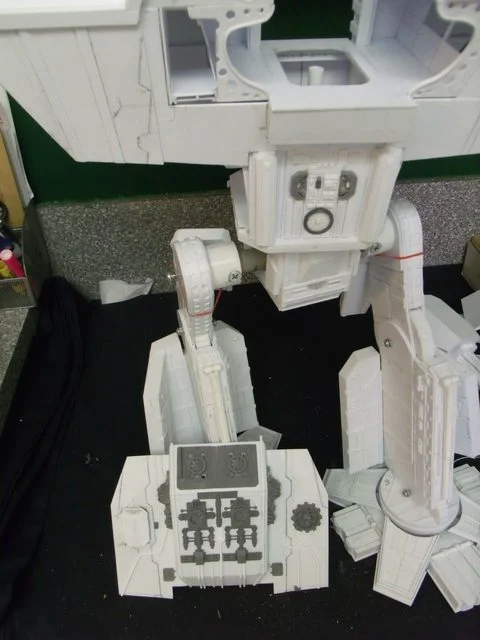
http://i.imgur.com/9Yhtb.jpg

http://i.imgur.com/UxRAa.jpg
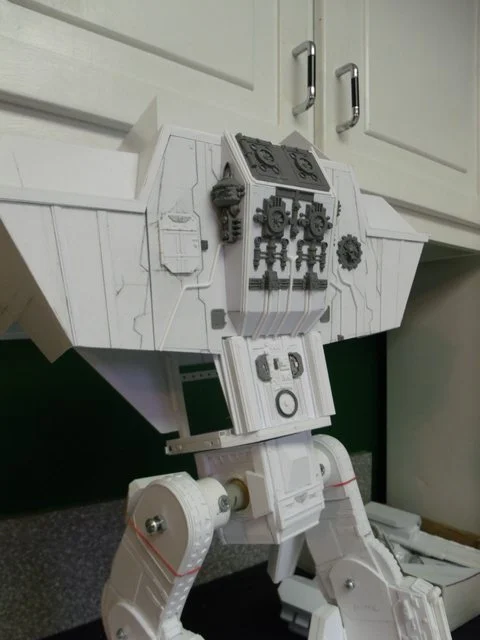
http://i.imgur.com/o9kIR.jpg
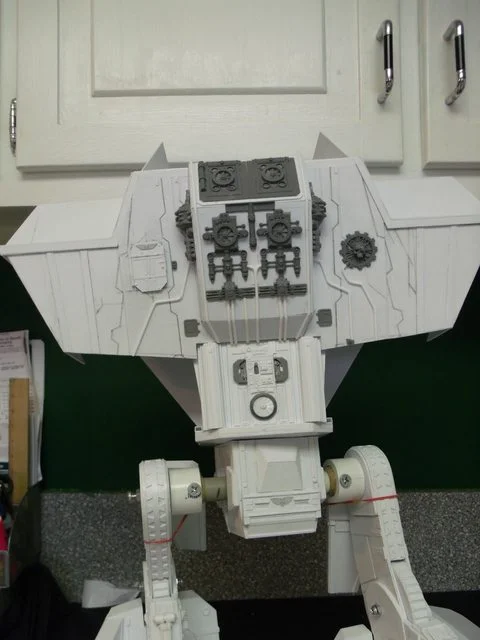
Purists may note that I changed a lot in the detail of the rear projection to suit my aesthetic sensibilities but since these vehicles are subjective to the FW, 'many worlds/many interpretations' I feel that Lucius Warlord Titans in a class have variations in that class depending on the 'Forge World' planet of origin. Plus I'm not going to buy a bunch of bitz just to copy the DS original.
There is almost assuredly an easier way to manufacture these components but my natural propensity for doing things the hardest way imaginable forced me to utilize the following method.
The goal is to have trunnion mounted capable of elevation rather than traverse turrets to mount the turbo lasers.
First I made the barrel shaped mounts using the method described below. I started with 1/2 inch PVC tubing which for some reason actually has a bore of about 3/4 inch. Now I need a veneer of styrene so I can glue detail to the surface and I need an axle made of styrene to permanently glue the end caps and detail to the axles and I need styrene trunnion receptacles to permanently glue to the upper carapace housing.
All these items must be the same size within a minor fraction of a millimeter i.e. about a hundredths of an inch or the discrepancy will be noticeable.
First I wrapped thins strips of styrene 0.250 inch wide around the center axles wrapping and gluing until the layers made a snug fit in the PVC gun mounts. Making sure the axles were 0.250 inches longer than the mount.
Then I wrapped 0.125 inch strips around the protruding ends of the axles installed in the PVC mounts so when completed there was two styrene discs on either end or the PVC tubes with a 0.5 inch tube running thru the center.
Next I wrapped 0.10 sheet styrene around the PVC to obtain a styrene cover to glue on subsequent detail.
http://i.imgur.com/Pmjal.jpg

This image left to right demonstrate the steps to make the trunnion mounts for attaching the elevation turrets to the carapace and they are build up in much the same manner as the above discription
http://i.imgur.com/tOX52.jpg
Here are the trunnion mounts afixed to the carapace and the inboard reinforcement is glued in place to provide strength when the laser mounts are moved.
http://i.imgur.com/ExJuS.jpg
This side show the rough laser mount in the carapace recess ready to be reinforced.
The goal is to have trunnion mounted capable of elevation rather than traverse turrets to mount the turbo lasers.
First I made the barrel shaped mounts using the method described below. I started with 1/2 inch PVC tubing which for some reason actually has a bore of about 3/4 inch. Now I need a veneer of styrene so I can glue detail to the surface and I need an axle made of styrene to permanently glue the end caps and detail to the axles and I need styrene trunnion receptacles to permanently glue to the upper carapace housing.
All these items must be the same size within a minor fraction of a millimeter i.e. about a hundredths of an inch or the discrepancy will be noticeable.
First I wrapped thins strips of styrene 0.250 inch wide around the center axles wrapping and gluing until the layers made a snug fit in the PVC gun mounts. Making sure the axles were 0.250 inches longer than the mount.
Then I wrapped 0.125 inch strips around the protruding ends of the axles installed in the PVC mounts so when completed there was two styrene discs on either end or the PVC tubes with a 0.5 inch tube running thru the center.
Next I wrapped 0.10 sheet styrene around the PVC to obtain a styrene cover to glue on subsequent detail.
http://i.imgur.com/Pmjal.jpg
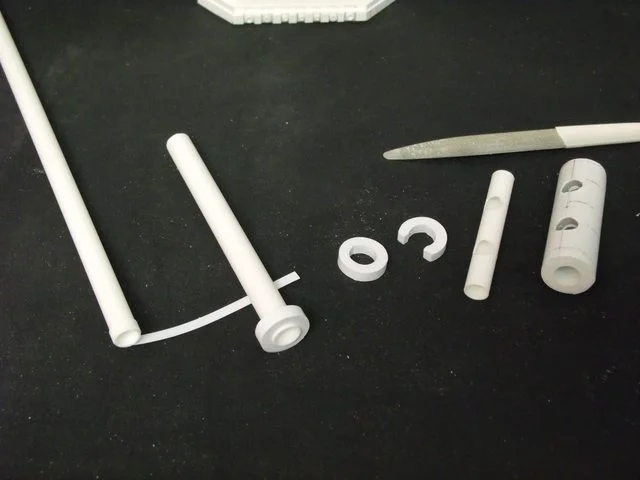
This image left to right demonstrate the steps to make the trunnion mounts for attaching the elevation turrets to the carapace and they are build up in much the same manner as the above discription
http://i.imgur.com/tOX52.jpg

Here are the trunnion mounts afixed to the carapace and the inboard reinforcement is glued in place to provide strength when the laser mounts are moved.
http://i.imgur.com/ExJuS.jpg
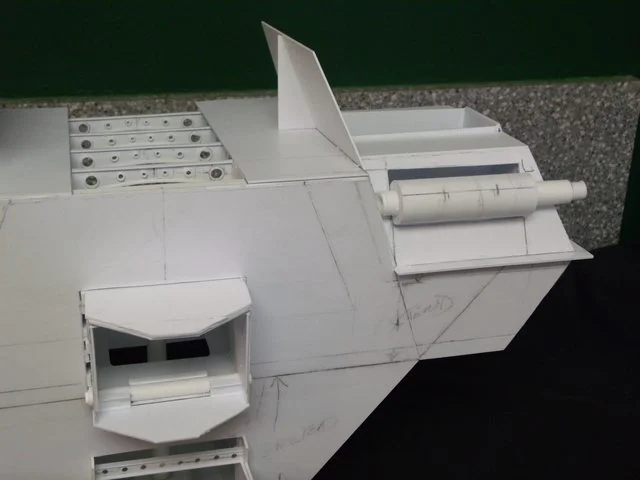
This side show the rough laser mount in the carapace recess ready to be reinforced.

You never cease to amaze us with your work. I can't wait to see it in all it's finished, and ultra precise, glory.
Turbo laser update and now its Moskva time.
http://i.imgur.com/8Zlgh.jpg
Note, drilling the holes for the laser barrel mounts is critical if you want both lasers to point in the same direction. Especially if you don't have a drill press.
http://i.imgur.com/hHbAn.jpg
These seem pretty straight.
http://i.imgur.com/8Zlgh.jpg
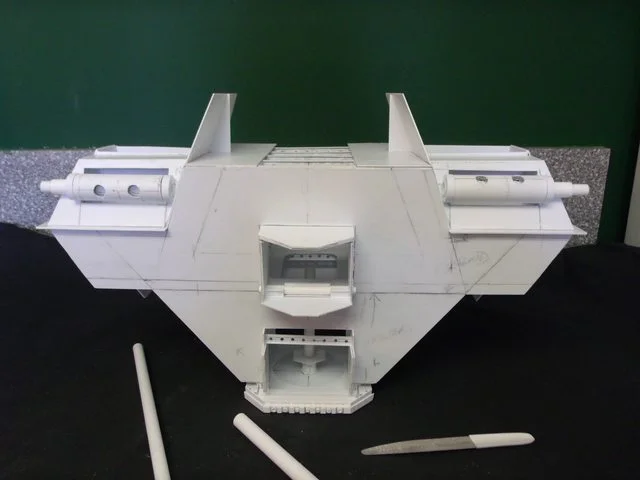
Note, drilling the holes for the laser barrel mounts is critical if you want both lasers to point in the same direction. Especially if you don't have a drill press.
http://i.imgur.com/hHbAn.jpg
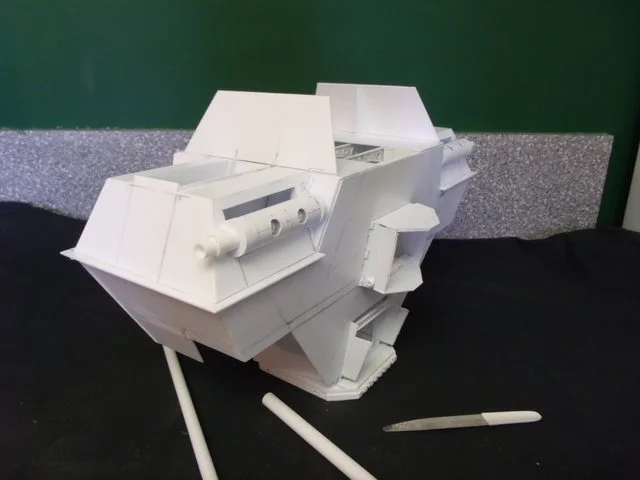
These seem pretty straight.
Wow its really hard to attach an image; unfortunately my image loader is malfunctioning.
I have new images of the current work and I'll try to link with images on another forum
View attachment awww.dakkadakka.com_s_i_at_at2_2012_10_11_1f9d8dc60e052587b17d259d6dfd9b0b_6825.jpg
View attachment awww.dakkadakka.com_s_i_at_at2_2012_10_11_8e8d4e76840570498848688d641f0e1d_6825.jpg
View attachment awww.dakkadakka.com_s_i_at_at2_2012_10_11_39752618b6384cac00790926b3c3e196_6825.jpg
I hope these images are visible and once my image host is back in business I'll replace these links. Let me know if the images are visible.
Thx EB
I have new images of the current work and I'll try to link with images on another forum
View attachment awww.dakkadakka.com_s_i_at_at2_2012_10_11_1f9d8dc60e052587b17d259d6dfd9b0b_6825.jpg
View attachment awww.dakkadakka.com_s_i_at_at2_2012_10_11_8e8d4e76840570498848688d641f0e1d_6825.jpg
View attachment awww.dakkadakka.com_s_i_at_at2_2012_10_11_39752618b6384cac00790926b3c3e196_6825.jpg
I hope these images are visible and once my image host is back in business I'll replace these links. Let me know if the images are visible.
Thx EB

:O
Looking awesome, mate! Keep on posting and make us happy
Btw. how much would you say that you've spent on the project? A rough estimate would be nice, as seeing something like this always makes me wonder how much I'd have to dish out if I'd want to try to make something similar. Besides, who wouldn't want a Warlord Titan as a front-room ornament? :tongue:
- Loran
Looking awesome, mate! Keep on posting and make us happy
Btw. how much would you say that you've spent on the project? A rough estimate would be nice, as seeing something like this always makes me wonder how much I'd have to dish out if I'd want to try to make something similar. Besides, who wouldn't want a Warlord Titan as a front-room ornament? :tongue:
- Loran
Loran said::O
Looking awesome, mate! Keep on posting and make us happy
Btw. how much would you say that you've spent on the project? A rough estimate would be nice, as seeing something like this always makes me wonder how much I'd have to dish out if I'd want to try to make something similar. Besides, who wouldn't want a Warlord Titan as a front-room ornament? :tongue:
- Loran
Thanks,
As for an estimated cost I just found a local sheet (3 feet X 4 feet) styrene distributer for a third what I was spending previously but I still have to purchase special shaped styrene from hobby stores. Case in point I just spent 28 bucks for more glue and strips and tubes. I can't count the cost as I just would have spent the money on booze and loose wimmen but if I had to estimate about 200 bucks.
The truth is you can't count what you spent on a hobby as it is recreation much as spending money on sports events and much more durable. The whole thing boils down to priorities; my entertainment needs are pretty basic, I still have a CRT TV and a 2003 auto but I do (Er will have...that is) a 30th century titan and that makes me happy even if I can't play the game.
Chacun son goût..............

To each his own taste...
As always Mr Blackadder, lovely stuff. I can't wait to see this puppy completed, if only because I want to see the Thunderhawk completed too!
As always Mr Blackadder, lovely stuff. I can't wait to see this puppy completed, if only because I want to see the Thunderhawk completed too!
In a headlong career of activity ( For me that is. ) I added significantly to the basic structure and the finer detail this week and I thought before I got too far I should post an update. I'm very glad to relate that the void generator housing have a goodly start and the carapace magazine covers (BTW they are removable to access to main weapon armatures) are fitted with Leman Russ hatches and a bit of detail as well.
http://i.imgur.com/1cJ6N.jpg
The center cover and inner walls of the generator housings are removable to view the interior detail of the reactor compartment.
http://i.imgur.com/64duE.jpg
The back view reveals the complete detailing of the left and right upper carapace.
http://i.imgur.com/YhT69.jpg
http://i.imgur.com/1cJ6N.jpg
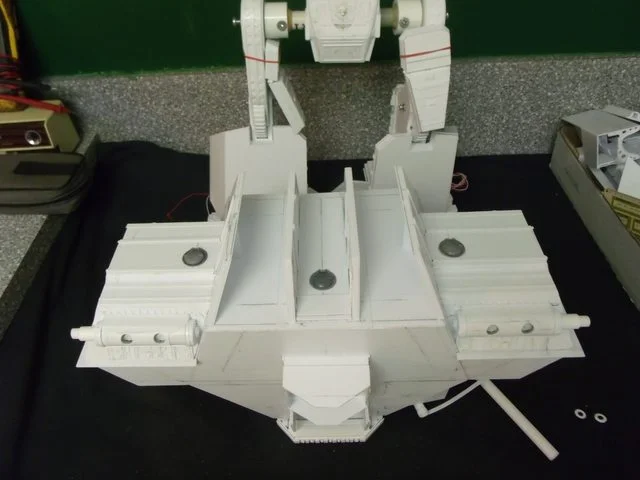
The center cover and inner walls of the generator housings are removable to view the interior detail of the reactor compartment.
http://i.imgur.com/64duE.jpg

The back view reveals the complete detailing of the left and right upper carapace.
http://i.imgur.com/YhT69.jpg

the hidden one
Streets Ahead
If I had to choose two words to describe this project they would probably be holy and crap. This is so awesome.
First a question.
In the first attached image can anyone identified the outlined bitz?
http://i.imgur.com/Gh5Q9.jpg
I have had a chance to work on this model more than usual being laid up with a virus for the past three days.
As the poet said, It's an ill wind..........................
http://i.imgur.com/Xk2bU.jpg
http://i.imgur.com/z3XNn.jpg
http://i.imgur.com/X9ioC.jpg
http://i.imgur.com/5PcPT.jpg
In the first attached image can anyone identified the outlined bitz?
http://i.imgur.com/Gh5Q9.jpg

I have had a chance to work on this model more than usual being laid up with a virus for the past three days.
As the poet said, It's an ill wind..........................
http://i.imgur.com/Xk2bU.jpg

http://i.imgur.com/z3XNn.jpg

http://i.imgur.com/X9ioC.jpg

http://i.imgur.com/5PcPT.jpg
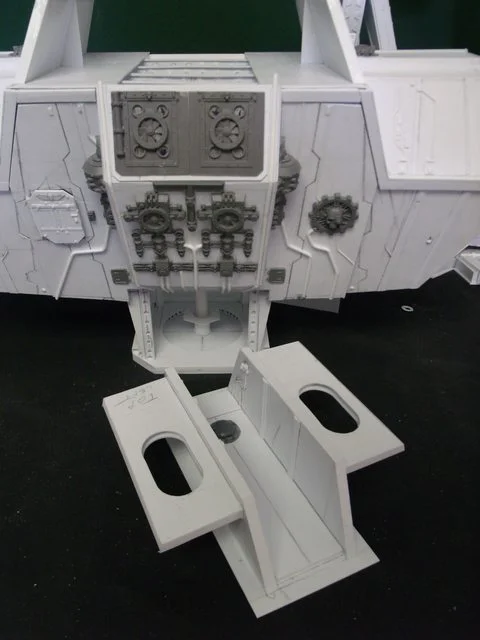
either way, more scratching less using easy bits doing!
Okay here's the deal sure I could scratch the entire Warlord (witness the first attached image) but even the legendary Dave Smith employed shortcuts; I mean if I have the bitz why not use them. Granted I'm not going to plunk down $50 bucks just to get a fan but since my son already had a CoD kit why not use the segments for something more than architecture.
Below are two of the four void generators (I'm only building two as the rest are hidden...........
http://i.imgur.com/LdAyD.jpg
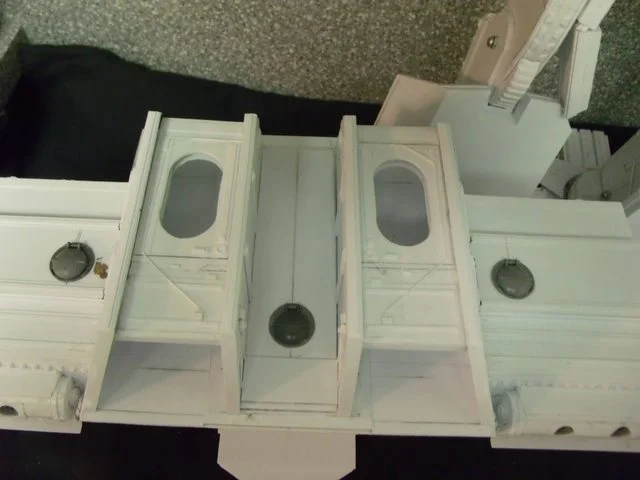
http://i.imgur.com/I1Avz.jpg
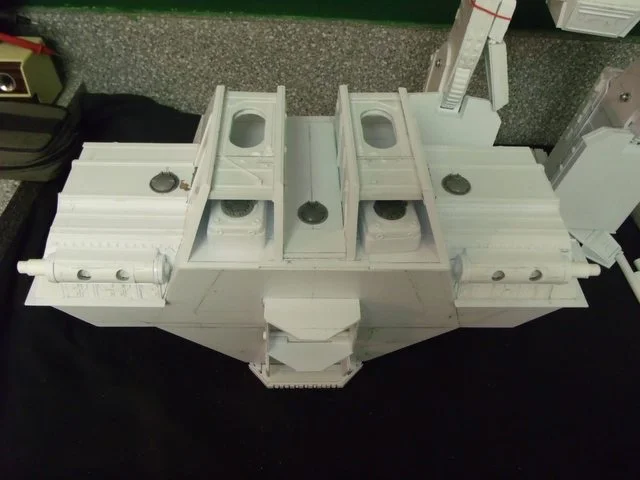
http://i.imgur.com/6Ugbl.jpg

Note all the detail is not attached but they did consume a fair portion of my allotted construction time.
I mean the goal is to finish this Titan in your lifetime more important in my lifetime your pardon if I can come across quite egocentric.
First of all it's a tribute to Dave Smith that the amount of detail he incorporated in his titan is astounding. Only one who has studied his images Ad nauseam can appreciate the scope of this monumental project
and I am only copying. Blazing the original trail would have been quite daunting.
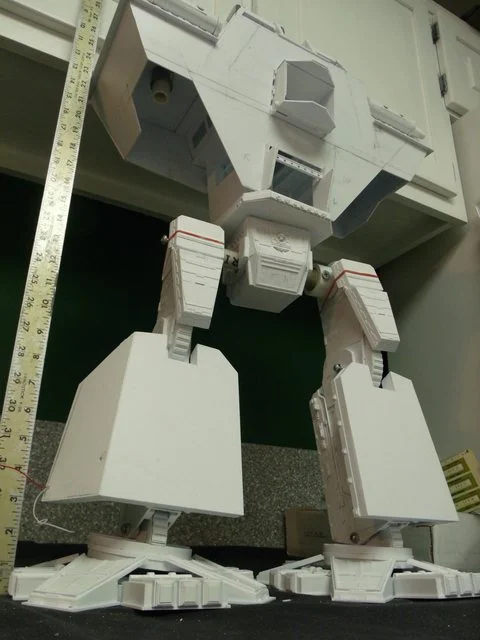
According tho the images below my titan will stand 27 inches 68.6 cm with the knees locked or about 26 inches 66.0 cm when in stride which approximates Mr Smith's work so there is not much discrepancy there.
http://i.imgur.com/VIovJ.jpg
My titans overall appearance as it is right now appears a tad on the thin side but the armour has yet to be bulked out and the arms armament hasn't been properly installed so when fully fleshed out I think there is probably cause for twinitization.
http://i.imgur.com/59ZZb.jpg
From a low angle the figure is quite imposing..................
http://i.imgur.com/sxjOp.jpg
I had some brass etched mesh left over from Lucie and it proved just enough for the void generator housing cooling apparatuses.
http://i.imgur.com/sAOeu.jpg
And the surface clutter is progressing nicely.
More to follow
and I am only copying. Blazing the original trail would have been quite daunting.
According tho the images below my titan will stand 27 inches 68.6 cm with the knees locked or about 26 inches 66.0 cm when in stride which approximates Mr Smith's work so there is not much discrepancy there.
http://i.imgur.com/VIovJ.jpg

My titans overall appearance as it is right now appears a tad on the thin side but the armour has yet to be bulked out and the arms armament hasn't been properly installed so when fully fleshed out I think there is probably cause for twinitization.
http://i.imgur.com/59ZZb.jpg
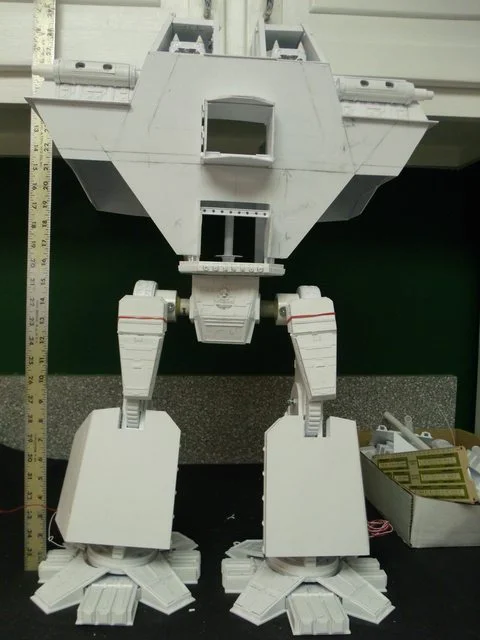
From a low angle the figure is quite imposing..................
http://i.imgur.com/sxjOp.jpg
I had some brass etched mesh left over from Lucie and it proved just enough for the void generator housing cooling apparatuses.
http://i.imgur.com/sAOeu.jpg
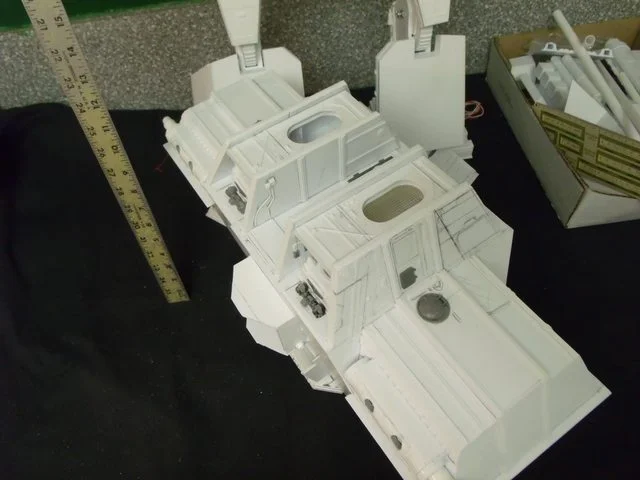
And the surface clutter is progressing nicely.
More to follow
I agree that you can't really put a price on this hobby. Yes, the miniatures cost a lot of money, but the work you put in the models and the enjoyment you get from doing it is pretty much something that you can't put a price on I was simply curious as to how much the materials have cost so far as, like I mentioned, I might try something similar :tongue:
Keep it up mate, looks amazing!
- Loran
I was simply curious as to how much the materials have cost so far as, like I mentioned, I might try something similar :tongue:Keep it up mate, looks amazing!
- Loran
Started in on making the hood yesterday with mixed results. I couldn't decide whether the hood should tilt down or project straight out so I compromised and tilted it down about 2° down which seems okay.
I took a few images with all the hull pieces temporarily in place to get an overall perspective on where I stand and all appears okay so I shall continue with the hood armour and glyphs.
http://i.imgur.com/US507.jpg
http://i.imgur.com/fEJGg.jpg
http://i.imgur.com/x5Xu1.jpg
http://i.imgur.com/TqKrb.jpg
I took a few images with all the hull pieces temporarily in place to get an overall perspective on where I stand and all appears okay so I shall continue with the hood armour and glyphs.
http://i.imgur.com/US507.jpg

http://i.imgur.com/fEJGg.jpg

http://i.imgur.com/x5Xu1.jpg

http://i.imgur.com/TqKrb.jpg

These little doors were very labor intensive but they do have functioning hinges and complete the front of the Void Generator housings
http://i.imgur.com/cyY0d.jpg
http://i.imgur.com/1d6m7.jpg
http://i.imgur.com/cyY0d.jpg

http://i.imgur.com/1d6m7.jpg

Yeah I know theres a lot of images of virtually the same thing tedious I know but the thing had to be done. Okay well deserved Martini in hand the final installation of this small and labor intense area is at last relatively complete except for the magnets that close the gaps and a bit of eye candy to dress out the detail.
This project will be judged by what meets the immediate eye and that is by the optimum point of view the top of the model at a 30° to 45° angle ergo the top so a lot of attention has to be paid to this area:
http://i.imgur.com/z2XLr.jpg
So here hopefully is the last dedicated posted to this area.
Next the hood.
The head being the Grand Finale I personally cannot wait.....
This project will be judged by what meets the immediate eye and that is by the optimum point of view the top of the model at a 30° to 45° angle ergo the top so a lot of attention has to be paid to this area:
http://i.imgur.com/z2XLr.jpg

So here hopefully is the last dedicated posted to this area.
Next the hood.
The head being the Grand Finale I personally cannot wait.....

Thanks for the offer I have downloaded the names of all the British warships from the last 6 centuries and whom among us can doubt the British have the coolest names for their warships and translated them into Latin (Google Translate) and come up with a few that might fill the bill meanwhile a question on the playability of this construct has arisen, namely:
I guess I should know this but it's a toss up of studying quantum physics and WH40k and fool that I am I opted for QP. Now that you are appreciably dazzled let me state that I am a mere tyro at QP as well of having none of the math credentials to even basically appreciate the subtleties of the Quantum theory but I have spent an inordinate amount of time trying to comprehend recent developments. Fortunately reading these events doesn't preclude my working contiguously on the detail of my project to duplicate the hood bling imaged below:
http://i.imgur.com/QLuHX.jpg
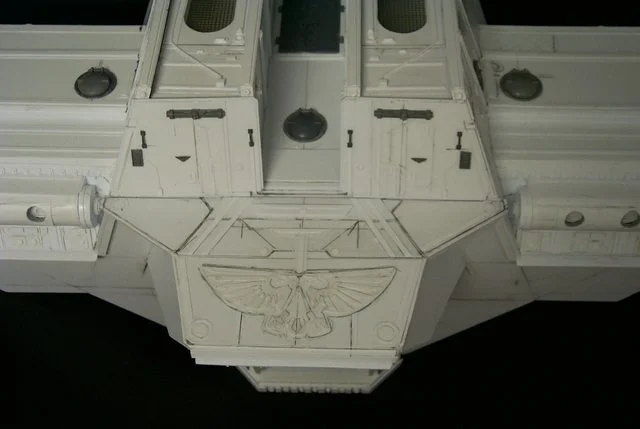
so here is the days run of labor namely the aquila insignia on the hood, I started with a google search for an apropos image
http://i.imgur.com/pwcW2.jpg

and edited it on my editor to fit the model. Tracing the result onto 0.010" styrene
http://i.imgur.com/uRKTC.jpg
I cut out the extremely tiny components and glued them to a 0.010" substrate which is where I am at the moment
http://i.imgur.com/5OaQz.jpg
taking a Martini break and tracking 'Sandy'.
Blackadder said:Inquisitor Pravious said:This mechanical beast that is so lovingly being build by Blackadder weighs in at 2500 points and has 9 structure points (Note that these are structure points not hull points). The full rules are in Apocalypse (which was released prior to 6th Ed, hence no reference to hull points, not sure if there is an errata to update the super heavy rules) so it is fully usable in an Apocalypse game of 40k.
I guess I should know this but it's a toss up of studying quantum physics and WH40k and fool that I am I opted for QP. Now that you are appreciably dazzled let me state that I am a mere tyro at QP as well of having none of the math credentials to even basically appreciate the subtleties of the Quantum theory but I have spent an inordinate amount of time trying to comprehend recent developments. Fortunately reading these events doesn't preclude my working contiguously on the detail of my project to duplicate the hood bling imaged below:
http://i.imgur.com/QLuHX.jpg

so here is the days run of labor namely the aquila insignia on the hood, I started with a google search for an apropos image
http://i.imgur.com/pwcW2.jpg

and edited it on my editor to fit the model. Tracing the result onto 0.010" styrene
http://i.imgur.com/uRKTC.jpg

I cut out the extremely tiny components and glued them to a 0.010" substrate which is where I am at the moment
http://i.imgur.com/5OaQz.jpg

taking a Martini break and tracking 'Sandy'.
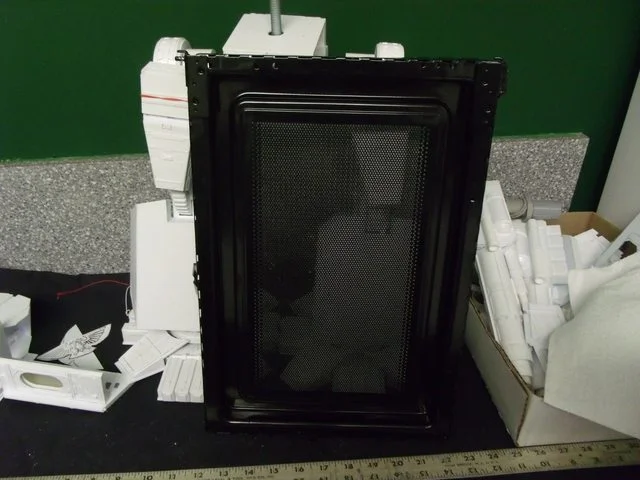
Okay boys and girls I'm about to impart the secret of Blackadder's millions. There's gold in them thar pieces of trash! It's commonly known that Blackadder is heavily into recycling. My old microwave has run its course to the extent that the floor of the chamber has rusted out and when I turn it on the under cabinet fluorescent lights glow so time to replace the old GE with a new one but wait. The door has this fantastic perforated shield panel! I don't know if you have priced this material in the hobby stores but it runs about $6 to 8 bucks for a few square inches and here's about a square foot about to be relegated to the curb......
http://i.imgur.com/MVIyP.jpg
Well I'm not about to toss $30 to 40 bucks down the crapper so I whips off the door and have enough vents to furnish a lifetime of 'scratching'.
Another helpful hint from EB AKA Heloise
http://i.imgur.com/MVIyP.jpg
Well I'm not about to toss $30 to 40 bucks down the crapper so I whips off the door and have enough vents to furnish a lifetime of 'scratching'.
Another helpful hint from EB AKA Heloise
A bit of an update on my recycling foray; there are some concerns as to the advisability of employing a microwave door for scratch bitz namely concerns about residual radiation lurking in the door!!!!!!!!!!!!!!!!!
I never stand near an operating microwave considering the average microwave oven is manufactured in the same country that is putting lead and mercury in our children's toys and asbestos and formaldehyde in our sheetrock not to mention they cannot seem to manufacture a decent paper clip or a pencil with an eraser that doesn't leave a trail of dirty rubber when rubbing out the graphite line but I digress;
A standard microwave door window has a millimeter thick steel perforated grill heavily enameled with black paint (radiation absorbing, I wonder?) sandwiched between two sheets of clear plastic about 0.25 mm thick each. Microwaves themselves are energetic photons that are non-ionizing.
Non-ionizing radiation is very different than the dangerous ionizing radiation and are in the same family of EM waves as television and radio broadcasting. Because of the lower frequencies and reduced energy, it does not have the same damaging and cumulative properties as ionizing radiation. Microwave radiation (at 2450 MHz) is non-ionizing, and in sufficient intensity simply cause the molecules of water in the food to flip polarity rapidly, thereby causing friction, which produces the heat that cooks the food. you stand in much more danger using your cell phone than any residual radiation from handling that panel.
I never stand near an operating microwave considering the average microwave oven is manufactured in the same country that is putting lead and mercury in our children's toys and asbestos and formaldehyde in our sheetrock not to mention they cannot seem to manufacture a decent paper clip or a pencil with an eraser that doesn't leave a trail of dirty rubber when rubbing out the graphite line but I digress;
A standard microwave door window has a millimeter thick steel perforated grill heavily enameled with black paint (radiation absorbing, I wonder?) sandwiched between two sheets of clear plastic about 0.25 mm thick each. Microwaves themselves are energetic photons that are non-ionizing.
Non-ionizing radiation is very different than the dangerous ionizing radiation and are in the same family of EM waves as television and radio broadcasting. Because of the lower frequencies and reduced energy, it does not have the same damaging and cumulative properties as ionizing radiation. Microwave radiation (at 2450 MHz) is non-ionizing, and in sufficient intensity simply cause the molecules of water in the food to flip polarity rapidly, thereby causing friction, which produces the heat that cooks the food. you stand in much more danger using your cell phone than any residual radiation from handling that panel.


Yep, absolutely true blackadder. There is nothing dangerous about a microwave door. We're exposed to EM radiation 24/7, be it the power cables running through the walls, the cell phones, the radio, television... the list goes on. Microwaves do however have a higher frequency and thus a higher energy carried with it, which can be in fact dangerous. The thing is, that this radiation does not "stay" in the absorbing door, because the door is actually not absorbing the radiation as in absorbing the energy (I'll get back to that in a minute) - and even if it did... how or why should that energy get out again as damaging radiation... heat would be much more likely and plausible.
But that's not how that fancy absorbing door works. It's not the colour or anything like that... it's the shape. That perforated grill is made of a metal of some sort. You could view it as a lot of horizontal and vertical "sticks". If EM radiation hits such a stick the electrons in the stick start to move, so each stick in a way becomes an antenna and radiates itself. The whole point is, that this EM emission stacks with the radiation inside the microwave, reflecting it and annihilates (almost completely... but nothing is perfect) the radiation behind (outside) the grill. Once the radiation stops, the metal does also stop functioning as antenna.
Long story short. Recycle away and don't fall for scary stories like that.
Sorry for the long post but that had to get out.
Nice work on the aquila by the way, I figure it must be hard to cut out of plasticard having such a fine structure, any secret method on how to get that clean?
But that's not how that fancy absorbing door works. It's not the colour or anything like that... it's the shape. That perforated grill is made of a metal of some sort. You could view it as a lot of horizontal and vertical "sticks". If EM radiation hits such a stick the electrons in the stick start to move, so each stick in a way becomes an antenna and radiates itself. The whole point is, that this EM emission stacks with the radiation inside the microwave, reflecting it and annihilates (almost completely... but nothing is perfect) the radiation behind (outside) the grill. Once the radiation stops, the metal does also stop functioning as antenna.
Long story short. Recycle away and don't fall for scary stories like that.
Sorry for the long post but that had to get out.
Nice work on the aquila by the way, I figure it must be hard to cut out of plasticard having such a fine structure, any secret method on how to get that clean?
Dogmar said:Yep, absolutely true blackadder. There is nothing dangerous about a microwave door. We're exposed to EM radiation 24/7, be it the power cables running through the walls, the cell phones, the radio, television... the list goes on. Microwaves do however have a higher frequency and thus a higher energy carried with it, which can be in fact dangerous. The thing is, that this radiation does not "stay" in the absorbing door, because the door is actually not absorbing the radiation as in absorbing the energy (I'll get back to that in a minute) - and even if it did... how or why should that energy get out again as damaging radiation... heat would be much more likely and plausible.
But that's not how that fancy absorbing door works. It's not the colour or anything like that... it's the shape. That perforated grill is made of a metal of some sort. You could view it as a lot of horizontal and vertical "sticks". If EM radiation hits such a stick the electrons in the stick start to move, so each stick in a way becomes an antenna and radiates itself. The whole point is, that this EM emission stacks with the radiation inside the microwave, reflecting it and annihilates (almost completely... but nothing is perfect) the radiation behind (outside) the grill. Once the radiation stops, the metal does also stop functioning as antenna.
Long story short. Recycle away and don't fall for scary stories like that.
Sorry for the long post but that had to get out.
Nice work on the aquila by the way, I figure it must be hard to cut out of plasticard having such a fine structure, any secret method on how to get that clean?
Not at all I appreciate the long winded reply and while I myself was reluctant to elaborate on the subject I welcome your input.
There is a not too fine line between information and the point wear the reader's eyes glaze over but for me your input was pure ambrosia.
Science content appreciated............
I know there is a lot of anticipation regarding the manufacture of the head but I really need to finish the surrounding detail to get a good handle on relative size. You see I only want to do the helmet/cowl once and I want it perfect so there is no substitute for patience. Meanwhile the top of the hood is progressing nicely. Were it not for Hurricane Sandy I would have been well into the production of the forehead armor.
http://i.imgur.com/Lsdyt.jpg
http://i.imgur.com/KeBAr.jpg

Nice work on the aquila by the way, I figure it must be hard to cut out of plasticard having such a fine structure, any secret method on how to get that clean?
No the Aquila or any bas relief is not that hard and is one of the few instances I employ a #11 Xacto Knife. The trick is to have a new blade and a sharp template rendering. Naturally the interstices of the feather roots are the hardest to render but given the sharpness of an new blade the only requirement is practice, practice, practice!
Believe me I still PRACTICE!
So whenever my micro turns too old and gets ready for the dump I'll post the door to you? 
Really, that knowledge you have on the subject was enlightening. Something that I could never know without you guys!
The titan's comng along so awesomely well. I love the external texture, fantastic detail! :O
Really, that knowledge you have on the subject was enlightening. Something that I could never know without you guys!
The titan's comng along so awesomely well. I love the external texture, fantastic detail! :O